Unity DOTS 6. Entity와 Components
Entity
Entity는 GameObject와 유사하다. 다만 Entity는 코드를 갖거나 컴포넌트의 컨테이너 역할을 하지 않는다. 그저 독립적으로 존재하는 Data(Component)를 묶는 ID 역할을 한다.
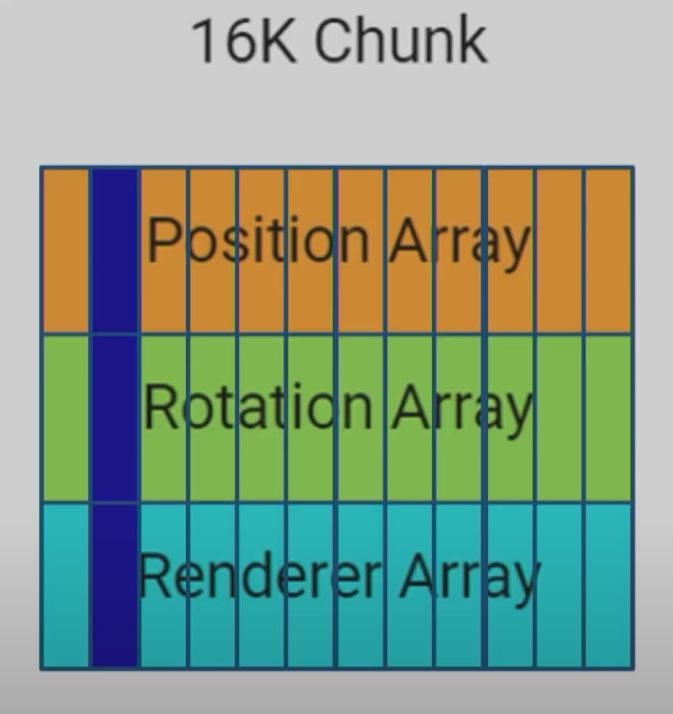
Unity에서 사용하는 Data Packing 방법은 Archetype^[Unity DOTS 1. 왜 데이터 지향 프로그래밍(DOP)을 사용하는가]을 사용하는 것이다. 실제 데이터는 Chunk로 관리된다. Chunk에는 Component가 연속적인 Array로 배치되며, 같은 Index에 있는 세로 줄이 하나의 Entity에 해당한다. 한 청크에 많은 엔티티를 넣을 수록 캐시 적중률이 높아진다. 그러기 위해선 컴포넌트 수가 적을 수록 한 청크안에 많은 엔티티가 들어간다. 따라서 엔티티는 딱 필요한 컴포넌트만 갖도록 하는 것이 좋다.
Component
컴포넌트는 시스템이 읽고 쓸 수 있는 데이터와 같다. 메모리 공간에선 Archetype 별로 16KB 용량의 Chunk 내에 저장되어 있다. 같은 Component일지라도 메모리에서 연속된 위치에 존재하지 않을 수 있다. 다른 Archetype이거나, 다른 청크에 있는 경우가 이에 해당한다. 여러 컴포넌트 타입이 존재한다.
- Unmanaged Component
- Managed Component
- Shared Component
- Cleanup Component
- Buffer Component
- Chunk Component
- Enableable Component
- Singleton Component
핵심은 Unmanaged와 Managed Component다. 나머지는 추가적으로 알아두면 유용하다.
Unmanaged Component
관리되지 않는 데이터만 Field로 갖고있는 Component다. 다음과 같이 만들 수 있다.
1
2
3
4
public struct ExampleUnmanagedComponent : IComponentData
{
    public int Value;
}
아무런 필드를 넣지 않는다면 태그와 같다. ExampleTagComponent만 쿼리함으로써 태그 역할을 한다. Tag Component는 Chunk에 저장되지 않는다.
1
public struct ExampleTagComponent : IComponentData  { }
Managed Component
모든 데이터(관리되는 데이터 포함)을 가질 수 있는 Component다. Managed Component는 제약 사항이 있다.
- Job에서 사용 불가능
- Burst Compile 사용 불가능
- 가비지 컬렉터가 관리함
- 캐시 적중률이 떨어짐
Managed Component는 하나의 큰 배열에 몽땅 저장되고, 청크에는 그 배열의 인덱스가 저장된다. 따라서 관리되는 컴포넌트를 사용하면 기껏 잘 Chunk로 Packing 해둔 데이터가 다시 흩어지게 된다. 그러므로, 될 수 있다면 Unmanaged Component를 사용하는 것이 좋다. 하지만 GameObject와 하이브리드로 사용하려면 불가피하게 사용하게 된다.
1
2
3
4
5
public class ExampleManagedComponent : IComponentData
{
    public int Value;
    public GameObject Prefab;
}
간단하게 위와 같이 만들 수 있다. Unmanaged와 다르게 class로 정의된다. 만약 관리되는 컴포넌트가 외부 리소스를 참조하는 경우, ICloneable과 IDisposable를 구현하는 것을 권장한다.
1
2
3
4
5
6
7
8
9
10
11
12
13
14
15
16
17
public class ManagedComponentWithExternalResource : IComponentData, IDisposable, ICloneable
{
    public ParticleSystem ParticleSystem;

    public void Dispose()
    {
        UnityEngine.Object.Destroy(ParticleSystem);
    }

    public object Clone()
    {
        return new ManagedComponentWithExternalResource
        {
            ParticleSystem = UnityEngine.Object.Instantiate(ParticleSystem)
        };
    }
}
엔티티를 복사할 경우, 해당 컴포넌트가 참조하는 외부 리소스도 복사되어 모든 엔티티의 컴포넌트가 하나의 리소스를 참조하는 오류를 방지할 수 있다. 또, 메모리 관리를 직접 하여 GC의 부담을 덜 수 있다.
Shared Component
1
2
3
4
public struct SharedComponent : ISharedComponentData
{
    public int SharedValue;
}
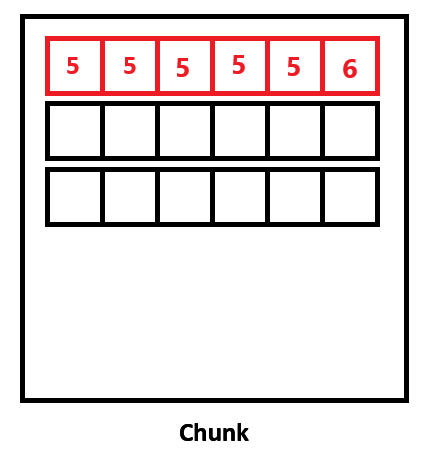
위와 같이 한 Chunk 안에 Component들이 들어있다. 만약 어떤 컴포넌트의 값의 가짓 수가 얼마 없다면, 많은 엔티티는 중복된 데이터를 가지게 될 것이다. 굳이 데이터를 중복해서 가질 필요가 있을까? 데이터를 하나만 만들어두고, 엔티티가 그걸 갖고있다고 치면 된다.
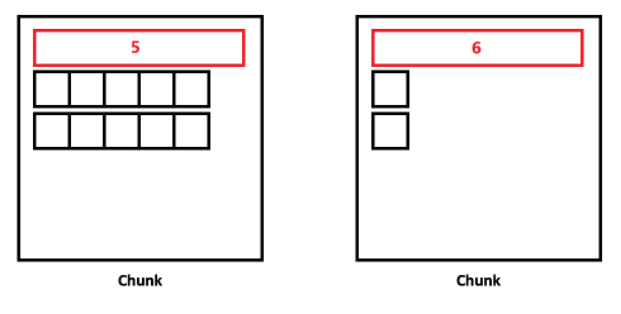
공유 컴포넌트는 위와 같이 구현된다. 엔티티가 갖는 공유 컴포넌트의 값에 따라 다른 청크에 배치된다. 이런 구조라면 공유 컴포넌트의 값으로 쿼리했을 때 캐시 효율성이 높을 것이다. 공유 컴포넌트의 값이 같으면, 같은 청크 내에 있기 때문이다.
실제로는 청크 내에 공유 데이터가 있지 않다. 공유 데이터는 외부에 어떤 배열에 존재하고, 그것을 참조하는 Handle을 청크가 갖고있다.
만약 한 엔티티에서 공유 컴포넌트의 값을 변경하면 구조 변경이 일어난다. 구조 변경은 추후 다룰 예정이지만, 간단히 설명하면 데이터의 메모리 위치 이동, 아키텍처나 청크의 구조가 바뀌는 것을 통틀어서 구조 변경이라고 부른다. 엔티티가 추가, 삭제되거나 공유 컴포넌트가 추가, 삭제될 때 구조 변경이 일어날 수 있다.
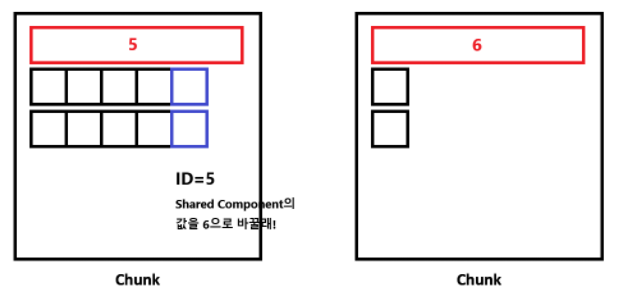
ID=5인 Entity는 컴포넌트 세개를 갖고있는 상황이다. Shared Component 1개, 그냥 컴포넌트 2개를 갖고있다. 이때, 이 엔티티가 Shared Component의 값을 6으로 변경한다.
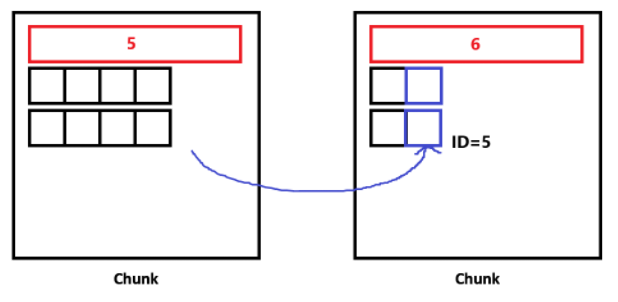
그 엔티티는 다른 청크로 이동해야 한다. 데이터의 메모리 위치가 변경된다. 이러한 구조 변경이 어떤 쓰레드가 해당 청크에서 작업중일 때 일어나면, 예기치 못한 오류가 발생할 수 있다. 따라서 모든 작업이 끝날때까지 기다린 후 구조 변경을 해야한다. 구조 변경을 위해 동기화를 맞추는 지점을 Sync Point라고 한다. 구조 변경을 자주 할 수록 쓰레드가 놀게 되는 경우가 많아진다. 따라서, 공유 컴포넌트의 값을 자주 Update하면 안된다.
[!NOTE] 정리해보자. 공유 컴포넌트는 다음 상황에서 유리하다.{title}
- 데이터의 가짓 수가 얼마 없을 때
데이터의 가짓수가 많은 상황에서 공유 컴포넌트 사용은 오히려 독이다.공유 컴포넌트의 가짓 수만큼 청크의 수가 생겨나며, 한 청크에 엔티티가 몇개 들어있지 않게 된다. 이는 메모리 공간으로 보나, 캐쉬 효율성으로 보나 최악이다.- 데이터의 용량이 클 때
Mesh Renderer에서 공유 컴포넌트를 사용한다.Mesh Data와 같이 용량이 큰 데이터를 복사해서 각 엔티티가 따로따로 가지면 메모리 낭비가 크기 때문이다.- 데이터의 값으로 쿼리하고 싶을 때
특정 데이터로 쿼리하여 엔티티를 얻어내면, 그 엔티티는 같은 청크에 있을 확률이 높으므로 캐시 효율이 좋다.
[!Question]- 만약 Shared Component의 특정 값을 가지는 Entity 개수가 너무 많아서 청크의 용량보다 커지면 어떻게 될까?{title} Shared Component의 실제 값은 청크 밖의 별도로 존재하는 배열에 저장된다. Chunk가 갖고 있는 것은, 그 공유 컴포넌트의 값을 참조하는 Handle일 뿐이다. 여러 Chunk는 동일한 Handle을 가질 수 있다. 따라서 Shared Component의 특정 값을 가지는 Entity 개수가 너무 많아도, 그저 같은 Shared Component Handle을 참조하는 Chunk의 수가 여러개가 될 뿐이다.
Cleanup Component
1
2
3
4
public struct ExampleCleanup : ICleanupComponentData
{
    public NativeArray<int> Array;
}
ICleanupComponentData으로 선언된 컴포넌트는 엔티티 삭제 명령으로 지워지지 않는다. 무슨 뜻인가?
1
2
3
4
5
Entity e = EntityManager.CreateEntity(typeof(Translation),
                                      typeof(Rotation),
                                      typeof(ExampleCleanup));

EntityManager.DestroyEntity(e);
기본 Component 2개와 Cleanup 컴포넌트 1개를 부착한 e 엔티티를 생성한다. 이후 e를 삭제하고 있다. 하지만 Cleanup Component를 가지고 있는 컴포넌트는 지워지지 않는다. 대신에 Cleanup Component를 제외한 모든 컴포넌트가 삭제된다. 따라서 e는ExampleCleanup 컴포넌트만 남는다.
이걸 왜 쓰는데? 메모리 정리가 필요한 데이터를 갖는 컴포넌트는 IComponentData 대신 ICleanupComponentData를 구현하는게 좋다. 예를 들어 NativeArray는 사용 후 Array.Dispose()를 통해 정리가 필요한 자료구조이다. 따라서 ICleanupComponentData를 사용하여 일단 지워지지 않게 만든다. 나중에 CleanupComponent만 갖고있는 경우만 쿼리하여 데이터를 정리하는 System을 만들면 메모리를 자동으로 정리할 수 있다.
Cleanup Component를 갖고있는 Entity를 완전히 지우려면, 그 컴포넌트를 삭제한 후 지워야 한다.
Buffer Component
위 예제에서 컴포넌트 내에 NativeArray를 사용하고 있기는 하지만, 권장되지 않는 방식이다. 대신 Dynamic Buffer 사용을 권장한다. Dynamic Buffer Component를 사용하는 것과 Native Collection을 IComponentData의 필드값으로 갖는 것의 차이점이 무엇인가?
- Dynamic Buffer Component
- 데이터가 청크에 직접 저장된다.
버퍼의 용량을 초과하면 그 이후부턴 데이터가 청크 밖에 저장된다.
- 메모리가 ECS 프레임워크에 의해 자동으로 관리된다.
- 데이터가 청크에 직접 저장된다.
- Native Collection In IComponentData
- 데이터가 청크에 저장되지 않는다.
청크에는 Native Collection을 가리키는 Handle이 저장된다.
- 프로그래머가 직접 메모리를 관리해야 한다.
- 데이터가 청크에 저장되지 않는다.
생성 방법은 다음과 같다.
1
2
3
4
5
[InternalBufferCapacity(16)]
public struct ExampleBufferComponent : IBufferElementData
{
    public int Value;
}
어트리뷰트로 Buffer의 Size(Capacity) 를 지정해줄 수 있다. 만약 Buffer의 용량보다 더 많은 데이터를 넣으려고 하면 어떻게 될까? 답은 배열의 값을 청크 밖으로 꺼낸다. 이후 데이터의 수가 용량보다 더 작아진다 해도 데이터는 청크 내로 다시 들어오지 않는다. 따라서 캐시 효율성이 떨어진다. 그렇다고 너무 큰 용량을 잡으면 청크 내에 의미없는 빈 공간이 많이 생긴다. 따라서 너무 작지도, 크지도 않은 적당한 용량을 잡아야 한다. 만약 Buffer의 크기가 너무 많이 바뀐다면, 그냥 처음부터 청크 외부에 배열을 만드는 것이 좋다. InternalBufferCapacity를 0으로 설정하면 된다.
[!NOTE] 구조 변경이 일어나면, Buffer를 다시 얻어야 한다.{title}
EntityManager.GetBuffer<T>(Entity)를 사용해서 DynamicBuffer를 얻어낼 수 있다. 만약 구조 변경이 일어나면, 이전의 획득한 DynamicBuffer를 무효화시킨다. 그 이유는, Buffer의 실제 메모리 위치가 이동했을 수 있기 때문이다. 그렇게 되면 기존의 DynamicBuffer는 엉뚱한 메모리 주소를 가리키고 있는 것이 된다. 따라서 구조 변경 이후 DynamicBuffer를 다시 얻어내야 한다.
[!Tip]- Job에서 Entity가 Buffer를 가지고 있는지 체크하는 방법{title}
Job에선 EntityManager를 사용할 수 없다. 따라서
EntityManager.HasComponent<>()메서드도 사용할 수 없다. Entity가 해당 Buffer Component를 갖고있는지 Job에서 체크하려면, BufferLookup을 사용하면 된다. Job을 위와 같이 만들고, System은 아래와 같이 BufferLookup을 설정해주면 된다.
[!tip]- 쉽게 Buffer 내용을 쓰는 방법{title} Buffer의 값을 수정하려면 다음과 같이 작성해야 한다.
MyElement는 IBufferElementData이고, 하위 Element로 int가 존재한다고 가정한다. 이렇게 귀찮게 말고,
myBuffer[2] = 6으로 하면 좋지 않나? 물론 가능하다.
buffer.Reinterpret\<U>()메서드를 사용하면 Buffer Type을 재 해석할 수 있다. 유용할 것 같다.
Chunk Component
1
2
3
4
public struct ExampleChunkComponent : IComponentData
{
    public int Value;
}
EntityManager.AddChunkComponentData<ExampleChunkComponent>(entity)
Entity 뿐만 아니라 Chunk에도 Component를 부착할 수 있다. Unmanaged Component만 Chunk에 부착 가능하다. 위의 방법으로 entity가 속한 Chunk에 Component를 부착할 수 있다. 언뜻 보면 Chunk Component와 Shared Component 의 개념이 비슷해 보인다. 똑같이 청크에 있는 엔티티가 데이터를 공유하는 것 아닌가? 하지만 분명한 차이점이 있다.
- Component의 소유자가 누구인가?
- Shared Component의 소유자는 Entity다. Entity가 갖는 Component 값을 바꾸면, Entity가 다른 청크로 이동한다.
- Chunk Component의 소유자는 Chunk다. Chunk Component의 값을 바꾸면.. 그냥 값이 바뀌는거다.
- 실제 데이터가 어디에 저장되는가?
- Shared Component는 실제 데이터가 외부 배열에 저장되고, 그것을 참조하는 Handle을 Chunk가 갖고 있다.
- Chunk Component는 Chunk에 직접 저장된다.
- 값을 변경하는 것이 구조 변경인가?
- Shared Component : O
- Chunk Component : X
- 목적이 무엇인가?
- Shared Component : 중복 데이터 최소화
- Chunk Component : 최적화
핵심은 목적에 따라 무엇을 사용하느냐다. 중복 데이터를 줄이고 싶다면 Shared Component를 사용한다. Chunk Component는 작업을 청크 단위로 처리하여 계산을 대폭 줄이고자 사용한다. 마인크래프트를 해봤으면 이해하기 편할 것이다. 마인크래프트는 영역을 세로로 무한히 긴 Chunk로 구분한다. 어떤 청크(Area)가 플레이어의 가시 범위에 들어왔는지 아닌지 판단한다. 들어왔다면 청크를 렌더링하고, 그렇지 않다면 렌더링하지 않는다. ‘플레이어의 가시 범위에 들어왔는지’ 판단을 모든 엔티티 별로 수행한다면 매우 비효율 적일 것이다.
1
2
3
4
5
6
7
8
9
10
11
12
13
14
15
16
17
18
19
20
21
22
23
24
25
private void ChunkComponentExample(Entity e)
{
    // 전달된 엔티티 e가 속한 청크에 ExampleChunkComp를 추가합니다.
    EntityManager.AddChunkComponentData<ExampleChunkComp>(e);

    // ExampleComponent와 ExampleChunkComp를 가진 모든 청크를 찾습니다.
    // 청크 컴포넌트를 일반 IComponentData와 구분하기 위해
    // ComponentType.ChunkComponent를 사용해야 합니다.
    EntityQuery query = GetEntityQuery(
        typeof(ExampleComponent),
        ComponentType.ChunkComponent<ExampleChunkComp>()
    );
    NativeArray<ArchetypeChunk> chunks = query.ToArchetypeChunkArray(Allocator.Temp);

    // 첫 번째 청크의 ExampleChunkComp 값을 설정합니다.
    EntityManager.SetChunkComponentData<ExampleChunkComp>(
        chunks[0],
        new ExampleChunkComp { Value = 6 }
    );

    // 첫 번째 청크의 ExampleChunkComp 값을 가져옵니다.
    ExampleChunkComp exampleChunkComp =
        EntityManager.GetChunkComponentData<ExampleChunkComp>(chunks[0]);
    Debug.Log(exampleChunkComp.Value);    // 출력: 6
}
위는 청크에 컴포넌트를 추가하고, 컴포넌트를 갖는 청크를 쿼리하고, 청크 컴포넌트의 값을 설정하고, 가져오는 예제다. 만약 청크 컴포넌트를 읽기 전용으로 찾고 싶으면, 쿼리에서 ComponentType.ChunkComponent 대신 ComponentType.ChunkComponentReadOnly을 사용하면 된다.
Job에선 EntityManager를 사용할 수 없으므로, Job에 ArchetypeChunk를 전달하고 그 Chunk의 Component를 얻어오는 방법을 사용해야 한다.
1
2
3
4
5
6
7
8
9
10
11
12
13
14
15
16
17
struct MyJob : IJobChunk
{
    public ComponentTypeHandle<ExampleChunkComponent> ExampleChunkCompHandle;

    public void Execute(ArchetypeChunk chunk, int chunkIndex, int firstEntityIndex)
    {
        // 청크의 ExampleChunkComponent를 가져옵니다.
        ExampleChunkComponent exampleChunkComp =
            chunk.GetChunkComponentData(ExampleChunkCompHandle);

        // 청크의 ExampleChunkComponent를 설정합니다.
        chunk.SetChunkComponentData(
            ExampleChunkCompHandle,
            new ExampleChunkComponent { Value = 7 }
        );
    }
}
Enableable Component
쉽게 말해 껐다 켰다 할 수 있는 Component다. IComponentData 또는 IBufferElementData와 같이 IEnableableComponent를 구현하면 된다. 만약 이 기능이 없다면, 필드에 직접 public bool Active;를 넣거나, 컴포넌트를 삭제했다 추가하는 방식으로 구현해야 할 것이다.
1
2
3
4
public struct MyComponent : IComponentData, IEnableableComponent
{
    public int Value;
}
EntityManager, ComponentLookup<T>, EntityCommandBuffer, ArchetypeChunk에서 다음과 같은 메서드를 사용할 수 있다.
.SetComponentEnabled<T>(Entity e, bool b);.IsComponentEnabled<T>(Entity e)
1
2
EntityManager.IsComponentEnabled<MyComponent>(e);
EntityManager.SetComponentEnabled<MyComponent>(e. false);
1
2
3
4
5
6
7
8
9
10
11
12
13
14
// 1. Health 컴포넌트를 가진 새로운 엔티티를 생성합니다.
Entity e = system.EntityManager.CreateEntity(typeof(MyComponent));

// 2. Health 컴포넌트에 대한 ComponentLookup을 가져옵니다.
ComponentLookup<Health> healthLookup = system.GetComponentLookup<MyComponent>();

// 3. 생성된 엔티티의 Health 컴포넌트가 활성화되어 있는지 확인합니다.
bool b = healthLookup.IsComponentEnabled(e);

// 4. 엔티티의 Health 컴포넌트를 비활성화합니다.
healthLookup.SetComponentEnabled(e, false);

// 5. 비활성화된 상태에서도 컴포넌트의 데이터를 읽고 수정할 수 있습니다.
Health h = healthLookup[e];
비활성화된 컴포넌트는 일반적으로 쿼리되지 않는다. 하지만 데이터를 읽거나 수정할 순 있다. 비활성화된 컴포넌트를 쿼리하려면 EntityQuery의 추가 옵션을 설정해줘야 한다.
1
2
3
4
5
6
7
8
9
10
11
12
13
14
15
16
17
18
19
20
21
22
23
24
25
26
27
public partial struct EnableableHealthSystem : ISystem
{
    public void OnUpdate(ref SystemState system)
    {
        // 두 개의 엔티티 생성
        Entity e1 = system.EntityManager.CreateEntity(typeof(Health), typeof(Translation));
        Entity e2 = system.EntityManager.CreateEntity(typeof(Health), typeof(Translation));

        // e1의 Health 컴포넌트를 비활성화
        system.EntityManager.SetComponentEnabled<Health>(e1, false);

        // 기본 쿼리: 활성화된 Health와 Translation 컴포넌트를 가진 엔티티만 포함
        EntityQuery activeQuery = new EntityQueryBuilder(Allocator.Temp)
            .WithAll<Health, Translation>()
            .Build(ref system);

        // activeQuery는 e2만 포함 (e1의 Health는 비활성화 상태)

        // 비활성화된 컴포넌트를 포함한 쿼리
        EntityQuery allQuery = new EntityQueryBuilder(Allocator.Temp)
            .WithAll<Health, Translation>()
            .WithOptions(EntityQueryOptions.IgnoreComponentEnabledState)
            .Build(ref system);

        // allQuery는 e1과 e2 모두 포함
    }
}
Singleton Component
World에 어떤 Component가 딱 하나만 존재하면, 자동으로 Singleton Component로 인식된다. 만약 다른 엔티티에 그 컴포넌트가 부착되면, 더이상 Singleton Component로 인식되지 않는다.
1
SingleComponent settings = EntityManager.GetSingleton<SingleComponent>();
단순히 GetSingleton 메서드로 얻어올 수 있다. 만약 컴포넌트가 world 내 2개 이상 존재하면 GetSingleton으로 얻어낼 수 없고, 쿼리해야 한다.
[!warning] Singleton Component는 쓰레드에 안전하지 않다.{title} 따라서, 싱글톤 컴포넌트를 사용할 때 컴포넌트가 갖는
NativeContainer만 사용하는 것을 권장하고 있다. Native Container는 쓰레드에 대해 안전하기 때문이다.그렇지 않다면,
EntityManager.CompleteDependencyBeforeRW<T>()를 호출하여 작업이 완료될 때까지 기다려야 한다.
References
- Unity ECS로 속도 향상, 캐릭터 5000개 만들어 보기
- [ECS/DOTS #3] ECS에서 물리 엔진 Unity Physics 사용해 보기 [Best Tips & Tricks by Unity Japan] - YouTube
- UNITY DOTS - ICompoentData 에 대해 알아보자.
- Entities - 컴포넌트 구조
- What are the point of dynamic buffer components when native collections exist? - Unity Engine - Unity Discussions
- Component concepts | Entities | 1.0.16
- Unmanaged components | Entities | 1.0.16
- Managed components | Entities | 1.0.16
- Shared components | Entities | 1.0.16
- Cleanup components | Entities | 1.0.16
- Tag components | Entities | 1.0.16
- Dynamic buffer components | Entities | 1.0.16
- Chunk components | Entities | 1.0.16
- Enableable components | Entities | 1.0.16
- Singleton components | Entities | 1.0.16